Shirley's Blog
Check out my blog.
Sunday, December 28, 2008
The Eagle has Landed
Look what my boys saw in the tree in front of our house? They said the eagle sat in the tree over a half hour. When they were walking home from school the eagle was there, so they ran into the house, grabbed the camera and took pictures from the living room.
Wednesday, October 8, 2008
My Favorite Lady
Friday, August 1, 2008
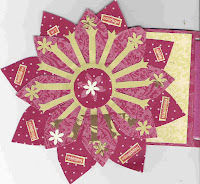
Layered Flower Card
I made this layered flower using templates. There were 4 templates. Large outer petals, medium petals, inner decorative layer and the circle in the middle.
I also stamped inspirational sayings to be placed on the petals. Then punched some small flowers for the final touches of decorating. The flower folds down to a tiny card and once open it is truly stunning.
Sunday, July 6, 2008
Clear Season Book
This clear acrylic season album was made for one of the exchanges I was doing this summer. It contains 5 pages of different sized acrylic sheets. The front she was approximately 3/4 inch small then the next, which was 3/4 in small then the next sheet. After minimal consideration I decided to have a season theme. Everything I used in my album came from the stash of supplies. I used square punches of 1 inch and 1 1/4 inches. To fill in openings I used my oval punches. The challenging part of this project was figuring out what showed from one layer to the next when the book was open to each page. Colors and shapes had to be coordinated.
Since I started the book with punch outs with the letters "SEASONS" I then had to use the same sized punch out for each subsequent page. Each square had to lined up with the page before it.
For Spring I went with the green color theme for most the colors. I also used some pastels. My images came from small stamped spring images and stickers. When the book is open the work "SPRING" is on the left page and a variety of images on the right.
For the "SUMMER" layout I utilized "Card Candy" that had been given to me in a swap. These images were already layered in coordinating colors and fit perfectly onto the square punches. I used. I also had some beach stickers and silver flowers to complete the pages.
My main color for Winter is blue to represent snow. Winter also has Christmas colors so they are included in the layout. I found some great snowflake rubons and shiny stickers. I also had some snowman designer paper. The Winter pages are the widest of all the pages in this album. This allows additional creativity.
To finish my album I found some heavy duty stickers made by Stampin' Up. They express the unique and creative spirit of this album. Their colors were also quite different from all the pages. These stickers aligned perfectly with my punched squares used throughout.
I hope you enjoy looking at my album as much as I did making it.
Now I have to give it up to a friend.
Monday, May 12, 2008
Let's Party
Cuttlebug Card
Friday, March 21, 2008
Morning Glory Sympathy Card
Sympathy Card
My sister-in-law wanted some sympathy cards so I looked through my bins of stickers, images, sentiments and scraps and found some great items to use for her her cards. I liked the cards so much that I have to share them with others. I hope she likes the cards I made!
This was a rose I painted with my FAVORITE coloring tool.... Twinkling H2Os.... I had all kinds of eyelets and used the Crocodile, which I named "Ear Tag" to place eyelets on the top, then fiber was woven through.
I hope you like this card as much as I do!
Remember Me
Saturday, January 26, 2008
Lady in a Hat
I made this card for a swap I am doing. The lady image was e-mailed to me and I printed it onto cardstock. Then I decorated. First I used a gold doily with the circles trimmed for her hat and dress. I mounted the circles onto 1 inch designer paper for the dress and mulberry paper for the hat. The jewelry was made from little beads and wire. The eye shadow and cheek color was chalks and the lip color was a red marker. She looked like a princess, so that is the title of the card "Princess." I did sponge the background in a light brown color. The card is mounted on corregated black paper.
Thursday, January 3, 2008
Wednesday, January 2, 2008
Birthday Collection
Here are my creations for a birthday kit swapped. I used items from my scrap bins to for the this collection. First I found candle images from a previous image exchange. There were enough images to create six of each of the three items requested in the swap. I then used Twinkling H2Os to give a background color wash for the candle which were painted with darker H2Os. Colors were chosen based on the background color wash I did for each item. For example the topper was color washed in light green and blue, so I used this as my theme colors for the topper. Blue became the main color.
For the topper I layered the image then added a ribbon. Since it did not lay flat and there was extra room I decided to punch flowers from the remnant cardstock and paper I used in the topper. I then attached the flowers and added glitter along with a baggie for items to be placed in.
For the card I wanted a different color combination from the topper, so I went with yellows, rusts, and browns. I found a vintage paper for the background and again punched flowers. I had some wide ribbon with lace to add to the card, then finished it off with glitter in the middle of the flowers.
The bookmark also used the candles and flowers, but with a purple color theme. For this I used a large flower image. Flowers were also punched for the back of the bookmark. Fibers in the color theme was added.
The three items for this kit relate to each other with the flower punches, color wash and the candles. I hope you like my creations. I do.
Subscribe to:
Posts (Atom)